What does a DNS flush do?
To help you understand this technique, we need to start from the beginning. Each time you visit a website, your computer will store its IP address inside your DNS cache. There will be DNS records showing your browsing history. That usually helps you visit sites faster, but in some cases, it could be a problem. 🤷♂️
When the old DNS records become an issue, you can remove them by performing a DNS flush.
📚 This article will explain:
Let’s get started! 🚀
What is DNS cache?
The DNS cache is a temporary database of domain names and their IP addresses stored by your devices.
Each time you visit a new site or use a new application, your device performs a DNS query to find the corresponding IP address to the domain you need. It will follow the DNS hierarchy in order to find its A record or AAAA record. When it gets the appropriate record, the device will save them inside its DNS cache.
Next time you want to visit the same site or use an application, your device will first search inside your DNS cache. If the DNS records are still there you will get connected directly, without the need for a new DNS search. This makes your browsing experience faster.
The DNS records stay inside the DNS cache, based on their TTL (time to live) value. The administrators of each domain set TTL values for their records, which determines how long these records can be used for. After the TTL time expires, your computer will delete it, and your computer will need to perform a new query to find the DNS records you need.
But what happens if you have a still valid record (its TTL hasn’t expired yet), but the administrator changed it inside the Authority DNS server? You won’t be able to connect to that site!
If you don’t want to wait until your DNS cache expires, you will need to perform a DNS Flush.
What does a DNS Flush do?
Flushing the DNS will remove all the IP addresses of the domains that the user previously visited and will leave the DNS cache empty. The term “flush” is used because it’s similar to a toilet washing everything away.
After the flushing, you won’t have any DNS records left on your device. Next time you request a domain in your browser, your device will need to find the domain’s IP address before you can get the content of the site.
This process won’t do any damage to you, your device, or any software. It will simply take a bit more time (around 100 ms) the next time you try to reach a site you have previously visited.
Why should you perform a DNS flush?
There are a few reasons to perform a DNS flush:
Stay discreet (leave no traces) 🕵
Even if you delete your browser history, the DNS records will still stay in the cache. Somebody with the right knowledge can check and see all the sites that you have visited.
If you have used somebody else’s computer or you have visited sites that you don’t want people to know, delete the DNS cache right after you finish. Do the operation each time you want to remove the traces.
If you have nothing to hide, you can leave the cache without cleaning. The records will eventually expire by themselves.
Speed up DNS propagation (for your device) 🏍️
DNS propagation, the process of DNS changes being sent to various servers and devices, takes time. If you have added or removed DNS records for your domain and you want to test the changes right away, you must perform a DNS flush. The next request you will perform to your domain will bring the changes and store them on your device.
Otherwise, you will need to wait until the previous records expire, and this can take a while.
The same is true if we are talking about a site that we don’t manage. Imagine a situation where Facebook.com has changed its IP address but you still have the old DNS record in your storage. You will try to reach the old IP address and you will get the error 404, Page Not Found. What does a DNS flush do is that it deletes the old record. You will then get the new one, the next time you try to reach the site.
Prevent DNS spoofing 🦹♂️
What does a DNS flush do to protect you from DNS spoofing?
To understand this, you need to understand what DNS spoofing is.
Imagine somebody injected your DNS cache with a spoofed DNS record. This is called a DNS cache poisoning attack. An attacker can access the cache, and change the IP address of a popular site, like PayPal.com for example. They can put the address to a fake site that looks like the real PayPal site. The attacker is betting on the similarity and waiting to get the victim’s credentials.
If the victim doesn’t see that it is a fake site, they can try to log in, submitting their credentials for that site to the attacker. Then the attacker can use the data and steal from the victim’s account.
Another DNS spoofing attack can be a Man-in-the-Middle attack. The criminal can locate a DNS resolver between you and the authoritative DNS server you are trying to reach. This resolver can look legitimate and answer you with a fake DNS record that can lead you to the criminal’s site.
A DNS flush will clean the infected DNS record and prevent these situations. However, if the attacker managed to spoof the DNS once, there could be still an open vulnerability that needs to be addressed.
How to flush DNS?
Now that you know what does a DNS flush do, let’s see how to perform it. The task is different, depending on your OS and even your web browser. Let’s see how exactly we can clear the cache.
- Windows DNS flush
- macOS DNS flush
- Linux DNS cleaning
- Google Chrome DNS cache cleaning
- Android DNS cache cleaning
- iOS DNS cache cleaning
Windows DNS flush
You can use the same processes on all Windows versions from the last 20 years – Windows 11, Windows 10, Windows 8, Windows 7, Windows Vista, and even Windows XP.
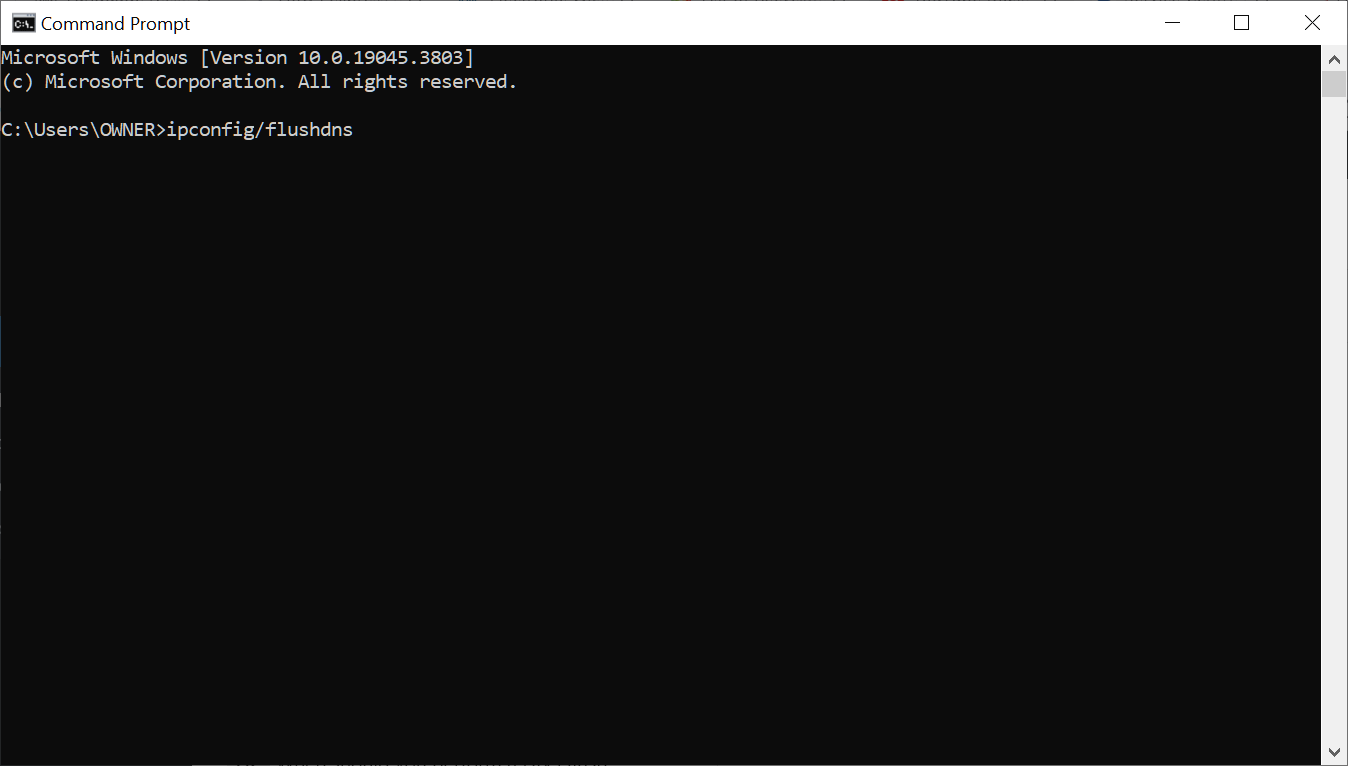
- Locate and open the Command prompt. In Windows 11 and Windows 10, you can simply click the Start and see it in the list. On previous versions, you can find it in Start>Accessories>Command prompt.
- Inside the Command prompt, type this command: ipconfig /flushdns.
- Press Enter and you will successfully flush the DNS cache.
macOS DNS flush
Depending on the version of your macOS, there are little differences in the commands that you will need to use.
- First, open the Finder and click on Applications.
- Inside the Application, find the Utilities and open the Terminal app.
- To flush the DNS on macOS 13 Ventura, macOS 12 Monterey, or macOS 11 Big Sur use the following command: sudo dscacheutil -flushcache; sudo killall -HUP mDNSResponder.
- Press Enter. The computer will ask for your administrator password. Enter your password and it’s ready.
In case you use older versions of macOS, check which is the right command that corresponds to it:
| MacOS version | DNS flush command |
| macOS 10.14 Mojave, macOS 10.13 High Sierra, macOS 10.12 Sierra, OS X 10.11 El Capitan | sudo killall -HUP mDNSResponder |
| OS X 10.10 Yosemite | sudo discoveryutil udnsflushcaches |
| OS X 10.9 Mavericks, OS X 10.8 Mountain Lion, Mac OS X 10.7 Lion | sudo killall -HUP mDNSResponder |
| Mac OS X 10.6 Snow Leopard | sudo dscacheutil -flushcache |
| Mac OS X 10.5 Leopard | sudo lookupd -flushcache |
| Mac OS X 10.4 Tiger | lookupd -flushcache |
Linux DNS cleaning
Linux does not have a built-in DNS cache, but different Linux distributions can have it.
Let’s see how can you clear the DNS cache on them on popular types of Linux, starting with Ubuntu:
- First open the Terminal app. You can do it by pressing Ctrl+Alt+T
- For Ubuntu 22.04 and newer, use the following command: sudo resolvectl flush-caches.
- Press Enter, enter your admin password, and press Enter again. Done.
If you are using another type of Linux and it uses different software for DNS, you can check this table:
| DNS software | DNS flush command |
| NCSD | sudo /etc/init.d/nscd restart |
| Dnsmasq | sudo /etc/init.d/dnsmasq restart |
| BIND | Use these 3 commands: sudo /etc/init.d/named restart sudo rndc restart sudo rndc exec |
Cleaning Google Chrome DNS cache
Now you know what does a DNS flush do, and also that browsers have their own cache, let’s explore how to delete it on Google Chrome. It is one of the most popular browsers and it is available on Windows, macOS, and Linux.
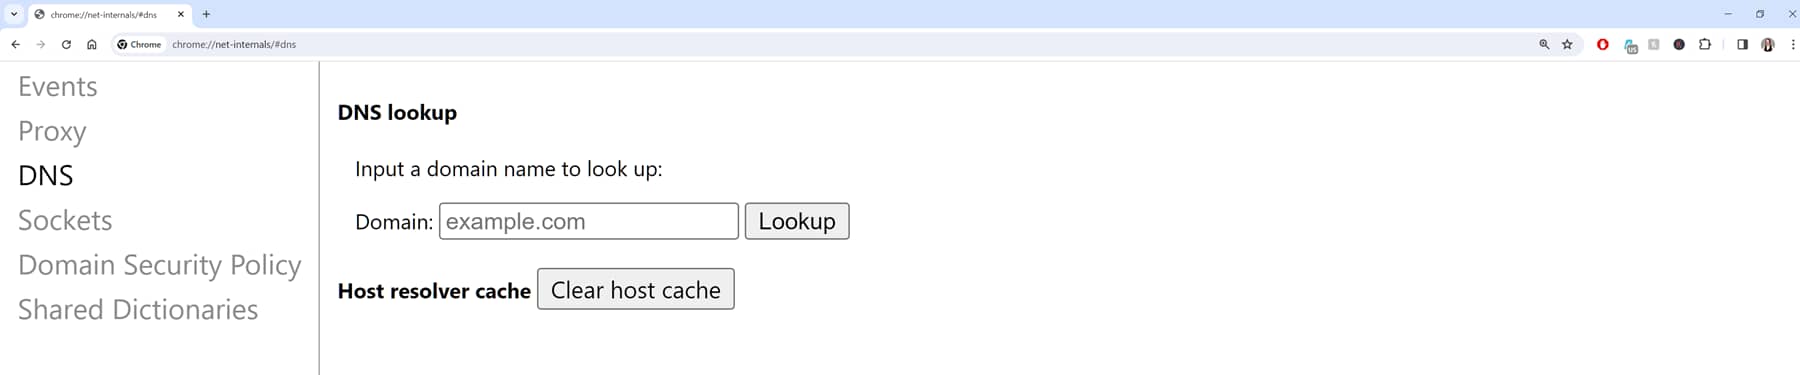
- Open Google Chrome.
- Type chrome://net-internals/#dns into your address bar.
- Select Clear host cache, and you are ready.
You can perform the same operation on other Chrome-based browsers such as Edge or Opera. You will only need to replace “chrome” with the name of the browser you are using.
| Browser | Address of the DNS cache settings |
| Edge | edge://net-internals/#dns |
| Firefox | firefox://net-internals/#dns |
Android DNS cache cleaning
You will need to delete the DNS cache of your browser and also delete the browser’s app cache.
Below, we will show you how to do it if you are using the Chrome browser.
- Open your Chrome browser.
- Type the following text chrome://net-internals/#dns into your address band and press Enter.
- You will enter the settings of the browser. There you will see Clear host cache. Click on it.
- After that, you will need to go to your Android phone’s settings.
- Locate the menu called Applications.
- Locate the browser you are using. In our case, it is Google Chrome. Open it.
- Now press Clear cache. Done!
iOS DNS cache cleaning
Now that you know what does a DNS flush do, let’s see how to do it in iOS. You can clear the DNS cache on your iPhone and your iPad too. Again, we are using Google Chrome as the browser.
- Open Google Chrome.
- Type chrome://net-internals/#dns into the address bar.
- Locate Clear host cache and click on it.
- Now go to the settings of your iOS device.
- Find the specific app. In this case Google Chrome. Press on Offload App. This will clear the app’s cache.
- Now go to General.
- Click on Reset, and then choose Reset Network Settings.
Conclusion 🧐
So, what does a DNS flush do?
It cleans your DNS cache and gives you a fresh start. This can fix some problems, caused by old DNS records, and allow you to visit a site, that you currently can’t.
It is a simple process, that you can do on almost every device, regardless of its operating system.
If you want to learn more about how to fix issues with DNS, check out our guide on how to fix “DNS resolution has high latency” error.