Want to know how to start a beauty blog?
Beauty is a competitive niche but you can still find success by covering unknown brands and offering authentic and unique takes on beauty.
In this article, we will show you how to start a beauty blog in ten steps, with links to further resources to help you create various aspects of your website.
Let’s get started!
How to start a beauty blog 📝
- Choose a beauty niche
- Purchase a domain
- Purchase hosting & SSL certificate
- Install WordPress
- Configure WordPress settings
- Add a lightweight theme
- Install plugins
- Add pages
- Create social media profiles
- Monetize websites
1. Choose a beauty niche
Many successful beauty blogs are covering broad niches like skincare, body care, makeup, and fashion.
You can’t compete against established authorities so you need to focus on sub-niches. For instance, you can focus on just the eye, lips, or nails. Other sub-niches include beauty product reviews for 50-year-olds, high-end luxury skincare, vegan or cruelty-free skincare, minimalist skincare, and DIY beauty products, among other things.
Pick one of these ideas and focus on establishing authority in a single niche first. After you find some success in a sub-niche you can expand into other niches.
2. Purchase a domain
After narrowing down on a niche, the next step in how to start a beauty blog is to choose a domain name. This will be the name of your website.
Here are a few pointers to help you choose a domain name:
- Use a domain name generation tool for ideas
- Use trustworthy domain extensions like .com, .net, and .org
- Keep your domain name short, between 6-12 characters
- Add popular keywords
- Make it easy to pronounce and spell
- Avoid using double letters, hyphens, and dashes
- Check for trademarks
We have expanded these points in two separate guides: How to Choose a Domain Name and our SEO Domain Name Guide.
If you want to get a lot of domain name suggestions in a hurry, you can use an online name generator like DomainWheel.
Using our name generator is easy: go to the DomainWheel Makeup and Beauty Business Name Generator and insert the word “beauty” or synonym terms. Click Search Domain and the tool will start suggesting domain names. All names suggested by DomainWheel are unregistered, so you can claim the domain right away.

You can use DomainWheel’s advanced filters to limit or expand character count, number of keywords, and domain extensions.
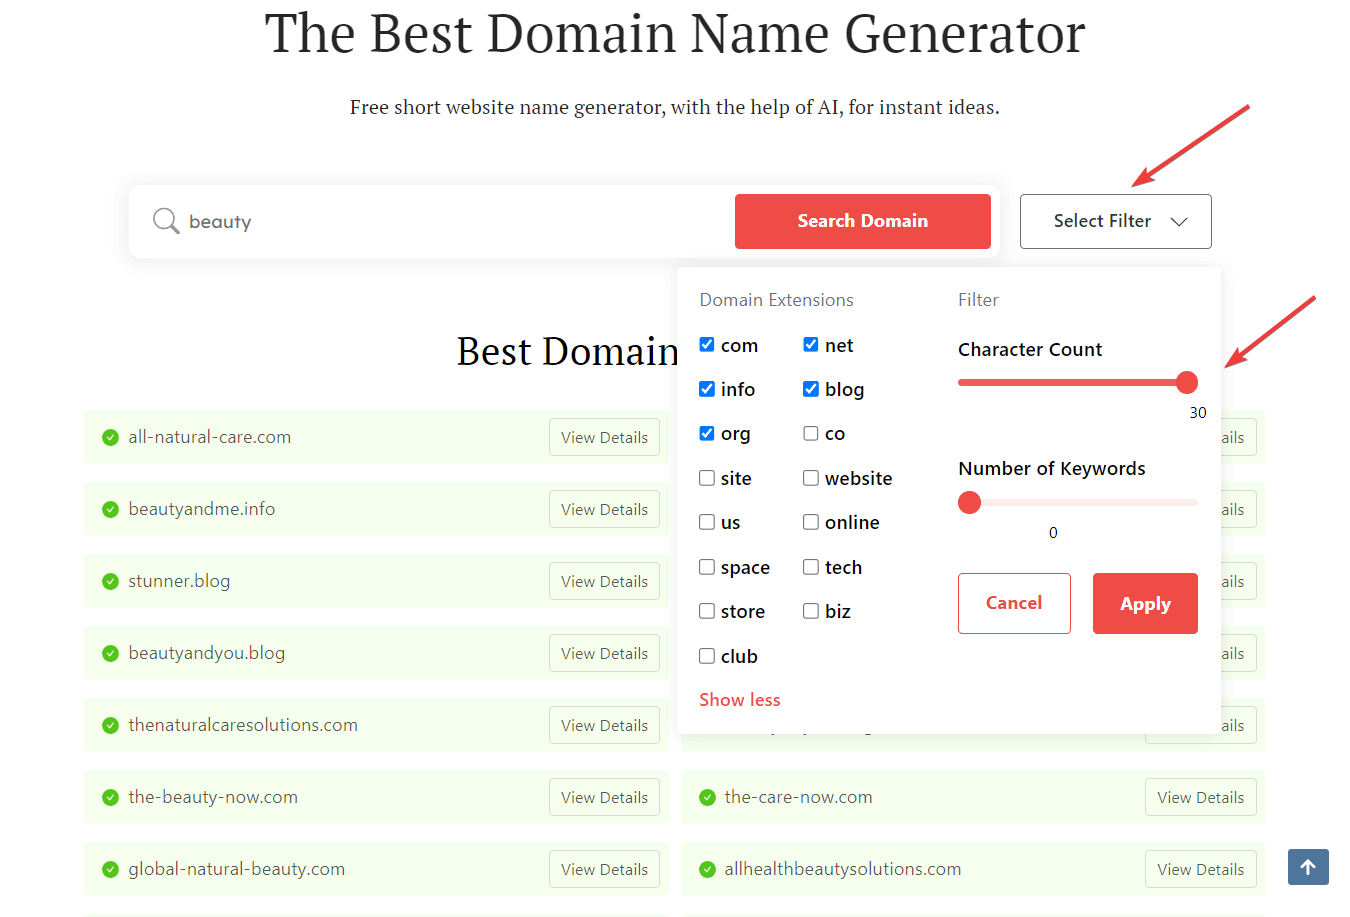
You can also use DomainWheel’s keyword suggestions (found underneath your search results) to come up with a domain name.

After you have selected a domain name, you can choose a domain registrar and register your domain.
You’ll also find that many domain registrars offer web hosting and many web hosts offer domain registration as a separate service. This means you can often get the domain and hosting together, as we’ll discuss in the next section:
3. Purchase hosting & SSL certificate
Hosting providers offer a server space to store your website. SSL certificates are software that authenticates a website’s identity as a legitimate business or blog.
In the past, SSL certificates were necessary only when you were collecting sensitive personal or financial information but today, it’s a mandatory step. Failure to install an SSL certificate will cause the browser to show an “insecure” warning to your site’s visitors. Google also deprioritizes websites without SSL certification.
Most hosting services offer domain names and SSL bundled into their hosting packages. We recommend choosing a hosting from our list of the best hosting providers and buying both the domain name and the SSL certificate from the same provider.
4. Install WordPress
The next step in how to start a beauty blog is also one of the simplest: installing WordPress.
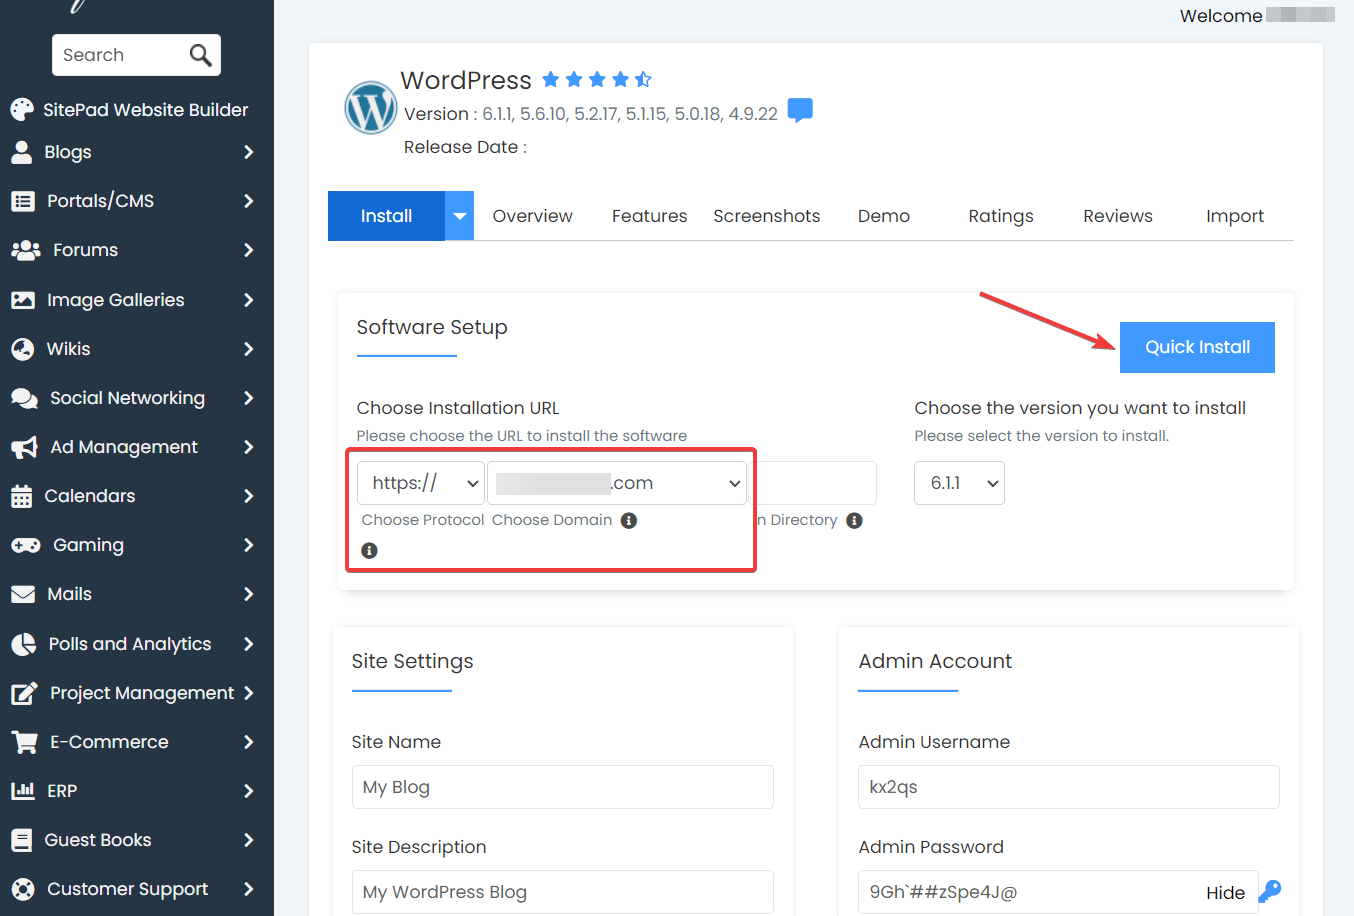
Open your hosting account and go to cPanel. The location of the cPanel varies based on the hosting company you choose. On NameCheap, it can be found underneath the first domain name we registered.

On the cPanel, go to Softaculous Apps Installer and select WordPress.

Next, on the Softaculous page, select the Install button.

On the next page, under Choose Installation URL, be sure to select the protocol as https and then choose your domain, as we have done in the image below.
Hit the Quick Install button and WordPress will be installed in a minute or two.
After WordPress is installed, Softaculous will give you the link to your site’s login page along with the username and password. Copy all three and store them in an online/offline notebook.
5. Configure WordPress settings
Configuring WordPress is an important step because it dictates how your website functions.
To configure WordPress settings, you need to open your site’s login page and enter the username and password.
After successfully logging in, you will be taken to the wp-admin dashboard. The Settings option can be found on the left side of the screen.
You will notice that there are 6 pages under settings. The pages are General, Writing, Reading, Discussion, Media, Permalinks, and Privacy. You will need to open each page and configure the options inside.

We recommend using this excellent beginner’s guide to WordPress settings to configure this section of your website properly.
6. Add a lightweight theme
The next step in how to start a beauty blog is to choose a theme. This will dictate the overall design of your website.
There are several themes to choose from but beware of heavy themes that make your website slow. It causes bad user experience and low ranks on search engines.
We recommend using lightweight themes like Neve and Hestia. These themes rank among the fastest WordPress themes. Both themes have a free version offering basic features which are sufficient for a new website. As your site starts growing, you can upgrade to access advanced features.
To install the theme on your website, open your wp-admin and go to Appearance > Themes > Add New.

In the search box located on the right side of the screen, insert Neve or Hestia. When the theme appears, select the Install and Activate buttons.
The theme will be activated on your WordPress site.

7. Install plugins
Plugins are software programs that help you add new functionality to your WordPress site.
You should consider adding the following plugins at the onset:
- Optimole: For optimizing your images and maintaining minimal page loading speed
- Otter Blocks: For designing intuitive pages and gaining trust from your site visitors
- WPForms: To create beautiful contact forms
- UpdraftPlus: For taking backups of your site
- Yoast SEO: To increase your organic traffic by implementing SEO techniques recommended by the plugin
To install a plugin on your site, go to Plugins > Add New and insert the name of the plugin in the search box. When the plugin appears, hit the Install and then the Activate buttons.

After installation, you will need to configure certain plugins like Yoast and Optimole. Check the help docs found on the official sites to configure the plugins.
8. Add pages
The next step in how to start a beauty blog is to add some core pages to your site. At minimum, you’ll need the following pages:
- About – A page explaining who you are, why you care about your beauty niche, and why people should listen to what you have to say.
- Contact– A page where visitors can access your contact information and/or use a contact form to reach you.
- Editorial Process – A page detailing how you choose what to write about. This should include whether or not you accept guest posts and whether or not you let companies submit products for review.
- Ads and affiliate policies– A page disclosing your policies around advertisements and affiliate links. This can also include information about how businesses can reach out if they’re interested in advertising on your site.
The about, contact, editorial, and ad policy pages allow you to earn the trust of your visitors and search engines.
9. Create social media profiles
Social media is an essential tool for marketing any online business. You need to create a social media profile as soon as you have the website up to secure social media handles.
After your social profiles are ready, you need a solid social media marketing strategy. We recommend reading up on current social media trends, crafting a strategy, and executing it as soon as you can.
Social media is a competitive space and finding success can take a while, so the earlier you start the better.
10. Monetize websites
To monetize your beauty blog, you can run ads, sell info products, and merchandise, and add affiliate links to your articles. If you have never heard of most of these monetization channels, then here’s a quick rundown:
- Ads: Create an account with premium ad networks like Mediavine and Adthrive
- Info product: Create a PDF with unique and authentic information and sell it on your blog
- Merchandise: Sell t-shirts, mugs, baseball caps, etc without your brand name or logo printed on it
- Affiliate links: Get a commission for products promoted on your blog
It’s important to note, that monetizing should be implemented only when your beauty blog is drawing a couple of thousands of visitors every month. Early implementation is unlikely to bring enough money and this can be demotivating for many bloggers.
Instead, use the time you would spend on implementing monetization strategies to create excellent content and market it through social media and other avenues.
Final thoughts on how to start a beauty blog 💭
Starting a beauty blog involves a lot of steps which can seem overwhelming for someone with little knowledge of building and running a site.
👉 We recommend setting aside a few hours to understand and implement the steps listed below:
- Choose a beauty blog
- Purchase domain
- Get hosting + an SSL certificate
- Install WordPress
- Configure WordPress settings
- Add a lightweight theme
- Install plugins
- Add pages
- Create social media profiles
- Implement monetization
And that’s it. By the end of the tenth step, you will have a beauty blog up and running.
Want help making your blog the best it can be? Check out the best blog title generators and the best meta description generators.