Want to learn how to start a fitness blog?
Starting a blog is a great way to share your experience with other people, connect with like-minded people, and generate some income on the side.
In this article, we will show you how to start a fitness blog so that you can start making money from your love of fitness.
Let’s dive into the tutorial.
How to start a fitness blog in 9 steps
- Step 1: Choose your niche
- Step 2: Develop a content strategy
- Step 3: Select a domain name & purchase it
- Step 4: Purchase a hosting plan
- Step 5: Install WordPress & Configure it
- Step 6: Install a lightweight theme
- Step 7: Install plugins
- Step 8: Create essential pages
- Step 9: Create social media profiles
Step 1: Choose your niche
Fitness is a broad niche. You can choose to create blog posts on everything related to fitness or you can decide to focus on a single sub-niche like weight-lifting, yoga, weight loss, fitness for a stay-at-home parent, or work-from-home employee, etc.
If you have a passion for a specific type of fitness (say weight loss) and you are an expert in that field or want to become an expert in that field, then a narrow niche is the way to go.
However, if you want to explore different topics and reach a wider audience, then going for a broader niche is a better idea.
Step 2: Develop a content strategy
Content strategy is the process of identifying how to use content to achieve your business goals.
Let’s say, your end goal is to create a fitness blog that makes money. To achieve this you can create blog posts to draw traffic to your site. You can then add affiliate links, ads, and digital products to generate income.
The most important part of developing your content strategy is finding topics that can draw traffic to your blog. You will need to carry out keyword research to find high-volume, low-competition topics in your niche. You can use a free tool like Ahrefs to conduct this research, then build blog posts around these keywords to attract more organic traffic to your blog.
Step 3: Select a domain name & purchase it
The domain name refers to the name of a website (like domainwheel.com).
You need to come up with a domain name for your fitness blog. We recommend using a domain name generator for ideas.
Open the DomainWheel fitness brand name generator and in the search bar insert your niche (i.e. fitness) or sub-niche (like yoga, weight loss, weight-lifting) then hit the Search Domain button. The tool will immediately suggest a few domain names.
You can choose one of those domain names or use them as ideas to create your domain name.

You can also filter the search by using the Select Filter option to expand or limit character counts, domain extensions, and the number of keywords.
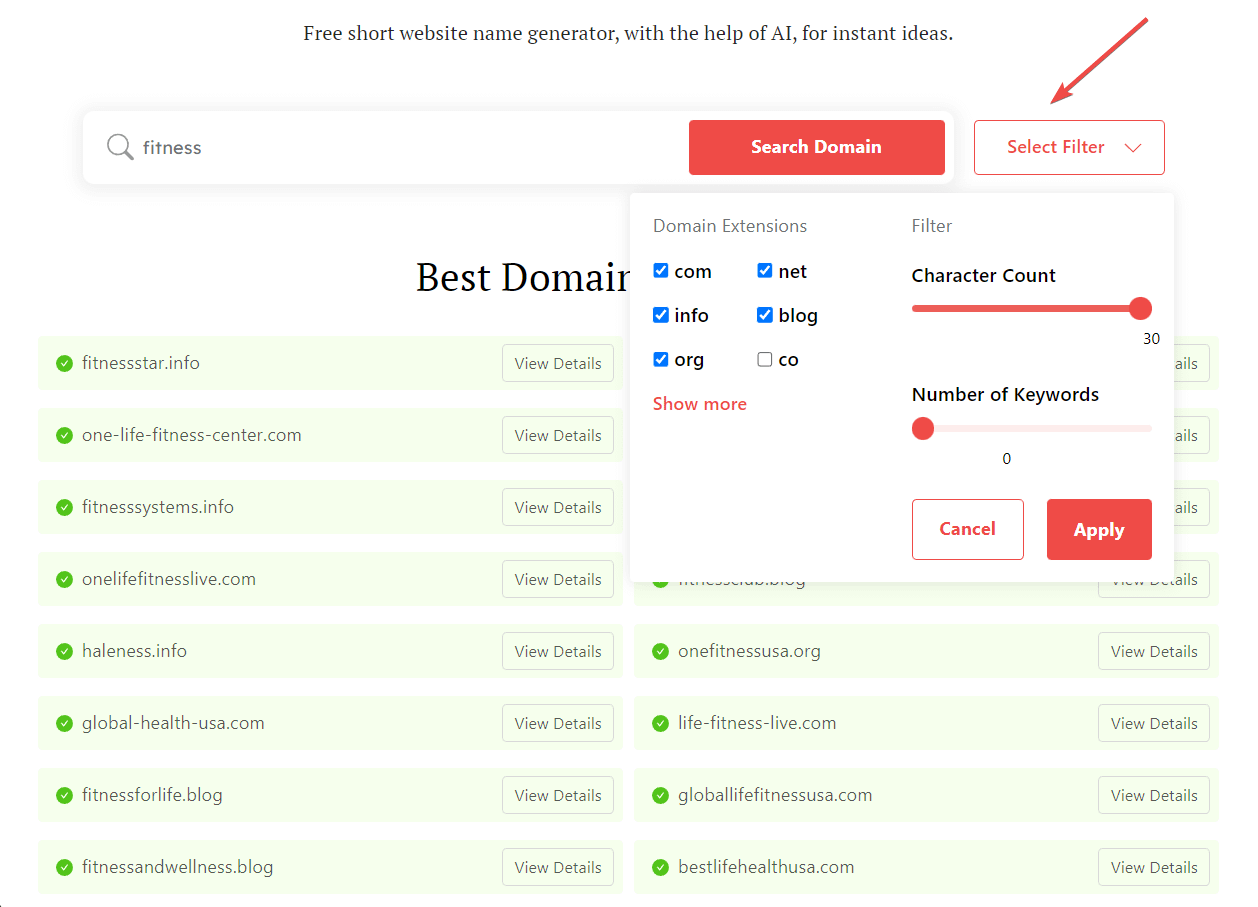
Scroll down on the same page to find more keyword suggestions for ideas for domain names.

After you have selected a domain name, purchase it from any one of these domain registrars.
Step 4: Purchase a hosting plan
Websites are made of files and folders. Hosting providers offer server spaces where these files and folders can be stored.
They also offer several types of hosting plans to choose from. Your fitness blog should start with an affordable shared hosting plan to keep your budget low. As your site grows, however, you’ll need to switch to a plan with more data storage and other resources, so make sure the web host you choose has a variety of plans that can accommodate your blog as it grows.
As for which hosting provider to choose, there are a few things to consider:
- Storage – You want to have plenty of storage space (at least 10GB) so you can create lots of content and incorporate things like images without needing to upgrade your plan.
- Bandwidth – This dictates how many people can visit your website in any given month. Look for a plan with a high bandwidth threshold to allow your site to grow significantly before you have to upgrade your plan. Many hosts also offer unmetered bandwidth, which protects your site from going down when faced with a major traffic spike.
- Bundled services – Many web hosts include services like domain registration and SSL certification in their plans so that you don’t have to pay separately for these essentials.
To learn more about web hosting, check out our guide to the best hosting services.
Step 5: Install WordPress & Configure it
The next step in how to start a fitness blog is to add WordPress to your site so you can easily create, organize, and publish content.
To install WordPress, open your hosting account, go to the cPanel, scroll down to the Softaculous Apps Installer section, and select WordPress.

Next, choose https:// as protocol and your domain name from the dropdown menu. Then hit the Quick Install button.

WordPress will be installed within a few seconds and you will be given the URL of your login page along with a username and password.
Step 6: Install a lightweight theme
A theme is responsible for the look and the loading speed of a website. While there are plenty of good-looking themes available out there, not all themes are lightweight.
Neve or Hestia are some of the few themes that are both beautiful and lightweight. If you feel the need for more features than you can get from the free versions, you can upgrade to Neve Pro or Hestia Pro.
To install any one of the themes we just mentioned, open your login page and use your username and password to log into your site.
Then go to Appearance → Themes → Add Theme and upload the theme using the Choose File option. Next, hit the Install Now and Activate buttons.

Step 7: Install plugins
Plugins are software that can be installed to add new features to your site. While the choice of plugins depends on your needs, there are some plugins that nearly all websites will require. Those are:
- Block plugin: Allows you to add custom blocks to help design the site. We recommend Otter Blocks.
- Image optimization plugin: It allows you to decrease the size of your images and implement lazy loading to boost page speed. We recommend Optimole.
- SEO plugin: Helps you create search engine-friendly posts and pages. We recommend Yoast SEO.
- Backup plugin: Helps you take regular backups of your site. We recommend UpdraftPlus.
- Caching plugin: It speeds up your site. We recommend W3 Total Cache.
- Contact form plugin: Allows you to create a contact form. We recommend WPForms.
To add these plugins, go to Plugins → Add New, and in the search box enter the name of the plugin. Then Install and Activate the plugin.

Step 8: Create essential pages
Every website needs a few standard pages like about, contact, privacy policy, and ad disclaimer.
To create these pages on your site go to Pages and hit the Add New option. You can then use the block editor to add text, images, and other content.
Step 9: Create social media profiles
The final step in how to start a fitness blog is to create social media profiles associated with your blog.
Social media pages allow you to discover new ideas and trends, bring attention to your work, engage with your target audience, create a brand, and send trust signals to your website visitors.
Create social media profiles on top social media platforms like Facebook, Twitter, Instagram, Pinterest, etc.
Final thoughts on how to start a fitness blog 🏁
Here’s a quick recap of the nine most essential steps in how to start a fitness blog:
- Choosing a niche
- Developing a content strategy
- Selecting a domain name and purchasing it
- Purchasing a hosting plan
- Installing and configuring WordPress
- Installing a lightweight theme like Neve or Hestia
- Installing essential plugins
- Creating essential pages
- Setting up social media profiles
As you can see, building a fitness blog is not difficult but it is a lot of work. Take your time to get it right and be sure to save this page in case you need to come back to it.
Starting your business on a tight budget? 💸 Check out our guide to how to start an online business with no money.